Welcome to LinuxQuestions.org, a friendly and active Linux Community.
You are currently viewing LQ as a guest. By joining our community you will have the ability to post topics, receive our newsletter, use the advanced search, subscribe to threads and access many other special features. Registration is quick, simple and absolutely free. Join our community today!
Note that registered members see fewer ads, and ContentLink is completely disabled once you log in.
If you have any problems with the registration process or your account login, please contact us. If you need to reset your password, click here.
Having a problem logging in? Please visit this page to clear all LQ-related cookies.
Get a virtual cloud desktop with the Linux distro that you want in less than five minutes with Shells! With over 10 pre-installed distros to choose from, the worry-free installation life is here! Whether you are a digital nomad or just looking for flexibility, Shells can put your Linux machine on the device that you want to use.
Exclusive for LQ members, get up to 45% off per month. Click here for more info.
Using the concepts and methods learned in Parts 1 and 2, the first example uses the plan and script layout in Part 2 to type, test and run a working shell script that can be modified by the user to do real work.
Before starting to write this script it needs to have a folder layout as shown in the script path assignments. $HOME is an external shell variable for your own home folder, which you will be in at this point. To create the folder structure as laid out use the following command.
Notice how this command's argument structure handles making a hierarchical list of folders, instead of using using four separate mkdir commands. You will find many of the shell commands have time saving typing tricks like this, mainly because personal computers didn't exist and messages were sent to the printer and keyboard over a slow wire from a server. The microchip and TV screen technology
First write a simple script which just acquires one bit of the information.
This is the script header, variable assignments, and a function with explanatory script comments.
Code:
#!/bin/bash
#namerecs.sh [information string]
#
#Script for acquiring reference information, and displaying and editing
#known name records in the namerecords.txt file.
#
#Path assignments
NHOME=$HOME/Projects/Namesref
NBIN=$NHOME/bin
NRECDIR=$NHOME/records
NRECS=$NRECDIR/namerecords.txt
#Variable assignments
FIRSTNAME=""
FNAME=""
LASTNAME=""
LNAME=""
COUNTER=0
#
#Error checking routines
#To be completed after debugging
#
#Initialisations
#Make sure the records file exists with the touch command
touch $NRECS
#Functions used in this script
#
UpperCase ()
{
   #Translate lower to upper case and place the result in the variable UCASE
   UCASE=`echo $1|tr a-z A-Z`
}
#
#
#Start of script commands
#A while loop for acquiring information that tests for an exit condition.
#
while [ "$FIRSTNAME" != "QUIT" ]
do
   #Clear the screen
   clear
   #Give an Instructional message
   #
   echo "Enter information as requested or enter quit as First Name to exit"
   echo ""
   #
   #A while loop to get FIRSTNAME, using FNAME as a temporary store.
   #The test looks for the condition that the number of characters, including spaces in the
   #variable, is greater than zero.
   #
   # If it is not, the user didn't enter any characters before hitting the Enter key.
   #The loop goes round to the start and asks again. Obviously when a name is entered,
   #the test condition to continue the loop is not true, and it goes to the line after
   #the loop “done” statement to continue the next script command.
   #
   while [ ${#FNAME} -lt 1 ]
   do
      echo "Enter Single Word First Name or quit to exit`"
      read FNAME
   done
   #
   #Change to Upper Case
   UpperCase $FNAME
   #Assign the Upper Case version to FIRSTNAME
   FIRSTNAME="$UCASE"
   #Reset FNAME so its loop can get another name
   FNAME=""
   #Test for exit string.
   if [ "$FIRSTNAME" = "QUIT" ]
   then
      #Break out of the rest of the QUIT condition loop and go back to its start
      #Where FIRSTNAME is tested to see if it is equal to QUIT
      continue
   fi
   #
   #Place holder for other acquisition while loops
   #
   #If not QUIT write record to file
   #Put the record into the file creating an index number from the number
   #of lines already in the file plus 1
   #This next piped command first counts the number of lines which gives a
   #line count followed by the filename
   #The second command uses the space as the field delimiter and prints
   #the first field
   #The result is put into LINECOUNT
   #
   LINECOUNT=`wc -l $NRECS | cut -d" " -f1`
   #
   #This command adds 1 to LINECOUNT for next index number
   #
   let LINECOUNT=$LINECOUNT+1
   #Append the fields each delimited by a #, to the records file
   #
   echo "$LINECOUNT#$FIRSTNAME#$LASTNAME" >> $NRECS
   #
done
#
#End of the acquiring loop
#
exit
#
See how clever the shell command interpreter is. Even though the final echo quoted string didn't contain any spaces to tell the interpreter where a new word or token starts, it was smart enough to know the “#” wasn't part of each named variable and to treat it as a new token. Because the # is in quotes, its special meaning as a comment marker has been escaped (not switched on).
Instead of #, you can use a space, a tab, a group of letters like XXX, or if you are using a clever editor like “vi”, you can even use and type in special characters like “Ctrl-f”.
I'll stick to the simple, easy to see, “#”.
Save the file you've created as Projects/Namesref/bin/namerecs.sh in your Home folder.
Once it is saved, change your working folder to the Projects/Namesref/bin/ folder.
When using cd to change folders, the shell environment variable called by $HOME can be used as a starting point to navigate into your own sub tree.
So:
Code:
cd $HOME/Projects/Namesref/bin
will take you there from anywhere. (see BOXOUT below)
Test it with the command
Code:
sh -x ./namerecs.sh
The dot slash in front of the script name tells the shell to find it by looking in the current folder.
Testing the script with the “x” option, prints out each assignment, command, and result, as it happens in the script. Any errors will be shown and the script will exit.
There are quite a few error condition routines that can put right in the script so it checks and actions common errors as it runs. Things like creating folders of the file tree, if they don't exist. I've left these pre known ones out as errors are discovered in the testing stage of creativity, and its good practical learning to find out and then write the fix.
If you have any, carefully look to see your mistake and fix it up and try again. Errors are most often caused by incorrect syntax like using the wrong sort of quote, missing quotes or brackets, or having spaces or new lines where none should be or vice versa.
Once this script is running correctly, the while loop for LASTNAME can be added. This will demonstrate what happens when two bits of information are collected. This new loop will be placed after the comment: #Place holder for other acquisition while loops.
Code:
   #While loop to get LASTNAME, using LNAME as a temporary store.
   #This tests for the condition that the number of characters, including spaces in the
   #variable is greater than zero. If is not, the user has entered some characters.
   #
   while [ ${#LNAME} -lt 1 ]
   do
      echo "Enter Single Word Last Name"
      read LNAME
   done
   #Change to Upper Case
   UpperCase $LNAME
   #Assign the Upper Case version to LASTNAME
   LASTNAME="$UCASE"
   #Reset LNAME so its loop can get another name
   LNAME=""
   #
This is a copy of the FIRSTNAME script portion, only the names have been changed. Test this in your script and have a look at the records file to see what is in it. You can now run the program properly with the command
Code:
sh ./namerecs.sh
Making it user friendly.
It works, but doesn't look visually pretty. Not very user friendly for ease of use.
The shell command “tput” can make things a lot nicer for the user by moving the cursor, colouring the screen, and clearing it. Tput uses the terminal capabilities to perform these and other actions.
A new function will be used to paint the screen and a tput command will colourize it. Enter this function after the UpperCase function.
As each variable is given a new value it need to update the screen. It does this with the function that repaints the screen.
To colour the screen add these lines after the line which says #Start of script commands.
Code:
#colour the screen
#
tput setb 6
tput clear
#
And to set the date field add this to the top of the Variable assignments,
Code:
EDATE=`date +%d/%m/%y`
You will have to change and delete some of the other lines to get all this new stuff to work correctly.
Delete these lines:
Code:
#Clear the screen
clear
#Give an Instructional message
echo "Enter information as requested or enter quit as First Name to exit"
echo ""
Replace them with:
Code:
#Paint the screen
ScreenPaint
For the First Name while loop delete
Code:
echo "Enter Single Word First Name"
Replace with
Code:
ScreenPaint
#Move the cursor to line 6 column 30. A column is a character position on the screen.
tput cup 6 30
For the Last Name while loop delete
Code:
echo "Enter Single Word Last Name"
Replace with
Code:
ScreenPaint
#Move the cursor to line 7 column 30. A column is a character position on the screen.
tput cup 7 30
Add a similar while loop to the Last Name with the ScreenPaint and tput changes for REFNUMBER using RNUM as the temporary store name. Add these two variables to the Variable assignments section with an initial value of “”. Use cup 8 30 as the tput arguments.
Finally change the record writing line and add 4 lines so it looks like this:
Code:
echo "$LINECOUNT#$FIRSTNAME#$LASTNAME#$REFNUMBER#$EDATE" >> $NRECS
#Reset the variables so that the screen displays are blank.
FIRSTNAME=""
LASTNAME=""
REFNUMBER=""
This has been a lesson in editing as well as extending your script functionality. You will do many of these editing actions as you learn, so it is best to learn early on.
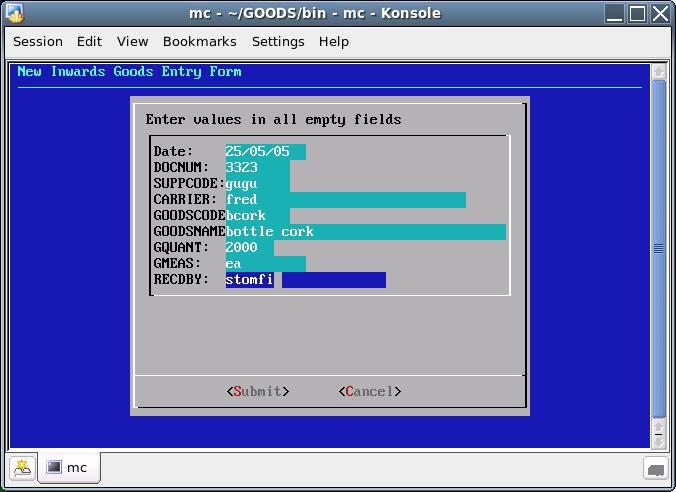
Your new tput enhanced script is ready for testing. You may have to change the spaces in the ScreenPaint function to put the cursor two spaces after the colon or you can change the number 30.
Also check the line numbers are correct.
Test without the x option for a correct view.
Code:
sh ./namerecs.sh
Picture of: Tput enhanced input screen
Enter some information and look at the record file.
EDATE is included so that records can be selected later in a data range.
Now that you have built a basic input script, before including commands to verify the input and check for existing records, the next example is a simple report. This will include the use of the awk tool, which has its own syntax. Awk is a very powerful user tool for scanning patterns in records and performing actions and filters, making totals, and changing output formats.
The name of this script will be namerep.sh and will be saved in the bin folder. Make a header and add the same File and Variable assignments as in the namerecs.sh file. This is an example of reuse. Even if they are not all used, it is quicker to copy the lot than create a new entirely specific section.
These are the script commands with embedded explanatory comments.
Code:
#
#Start of script commands
#Clear the screen
clear
#
#Awk processes files a line at a time.
#-F# tells awk that the field separator is a #. (awk default is tab)
#BEGIN{statements}. These tell awk to do these before it processes any input lines.
#The \n represents a newline.
#{printf "format" field numbers} tell awk to use format to print the fields.
#%10s tells awk this is a string 10 characters long.
#%-5d tells awk this is a left justified decimal number 5 digits long.
#The backslash at the end of each line escapes the newline which treats
#the command as one long line. The line has been split with new lines for readability.
#
awk -F# 'BEGIN{\
print "\n\n Names Reference Report\n\nIndex First Name \
Last Name Ref Number Record Date"}\
{ printf "%-5d %10s %-11s %-10d %s\n", $1,$2,$3,$4,$5 }' $NRECS
#
#Exit the script
exit
#
Notice that each group of awk statements are enclosed in curly braces and the whole line after the -F# option is enclosed in single quotes. The file name that awk processes comes at the end.
Awk will be used for other purposes within these articles, so try to remember the basics of it's syntax. Actually awk uses similar syntax and functions to the C programming language which was one reason why it was written like this. The articles will only use the simpler aspects of awk.
Run the new script with the command “sh ./namerep.sh” in the Projects/Namesref/bin folder.
Picture of: Simple Report Screen
Now that the two scripts are running OK, you can turn both of them into executable scripts inside the bin folder with the shell command:
Code:
chmod +x *.sh
They can now be run from their folder without the leading “sh”.
User friendly Menu
The report lists the records in the order they are entered into the file, but it might be more convenient to list them in reference number order or last name alphabetical order. In order to supply these options a reports menu can be constructed using the same methods used to paint the screen with tput. You could have a menu hierarchy with all the functions you need.
Here is a suggestion for the Names reference example.
Names Reference Menu
Name Reference Entry Screen
Name Reference Reports Menu
Index Sorted List
Reference Number Sorted List
Last Name Sorted List
In a hierarchy menu, each sub menu exits to the one above. Quitting the top menu, resets the terminal so its colour is back to white or black.
This is the script for the top level menu
Code:
#!/bin/bash
#namesmenu.sh
#Paint a menu and select script to run or quit
#
#Path assignments
NHOME=$HOME/Projects/Namesref
NBIN=$NHOME/bin
#Variable assignments
QUIT=0
SEL=0
#Initialisations
#colour the screen
tput setb 3
tput clear
#loop around gathering input until QUIT is more than 0 or SEL is not equal to 3
while [ $QUIT -lt 1 -o $SEL -ne 3 ]
do
   #paint menu onto the screen
   echo ""
   echo ""
   echo " NAMES REFERENCE MENU"
   echo " 1 ..... Names Reference Entry"
   echo " 2 ..... Reports"
   echo " 3 ..... QUIT"
   echo ""
   echo "Enter Choice Number: "
   #Move cursor to after select message
   tput cup 7 22
   #Delete from cursor to end of line
   tput el
   read SEL
   #Test the number of characters in SEL incase Enter was pressed by itself
   if [ ${#SEL} -lt 1 ]
   then
      continue
   fi
   #call the required shell
   case $SEL in
      1) exec $NBIN/namerecs.sh;;
      2) exec $NBIN/namereports.sh;;
      3) QUIT=1
         continue;;
      *) continue;;
   esac
done
#reset the screen
if [ $TERM = "linux" ]
then
   tput setb 0
fi
tput reset
tput clear
exit
Picture of: Top Level Menu
We are going to be clever with the reports by sorting the records file into a temporary file and reporting its contents with the namerep.sh script. In order for this to happen, include this line in the Path assignments in the namerep.sh script:
Code:
TMPRPT=$NRECDIR/reptmp.txt
and change the file variable name at the end of the awk command from $NRECS to $TMPRPT.
This is the reports menu script
Code:
#!/bin/bash
#namereports.sh
#Paint a menu and select script to run
#
#Path assignments
NHOME=$HOME/Projects/Namesref
NBIN=$NHOME/bin
NRECDIR=$NHOME/records
NRECS=$NRECDIR/namerecords.txt
TMPRPT=$NRECDIR/reptmp.txt
#Variable assignments
QUIT=0
SEL=0
#Initialisations
#Delete temporary report file if it exists. "-f" forces it to work without an error.
#
rm -f $NRECDIR/reptmp.txt
#colour the screen
tput setb 3
tput clear
#loop around gathering input until QUIT is more than 0
while [ $QUIT -lt 1 -o $SEL -ne 4 ]
do
   #paint menu onto the screen
   echo ""
   echo ""
   echo " NAME REPORTS MENU"
   echo " 1 ..... Sorted by Index Number"
   echo " 2 ..... Sorted by Reference Number"
   echo " 3 ..... Sorted by Last Name"
   echo " 4 ..... QUIT"
   echo ""
   echo "Enter Choice Number: "
   #Move cursor to after select message
   tput cup 7 22
   #Delete from cursor to end of line
   tput el
   read SEL
   if [ ${#SEL} -lt 1 ]
   then
      continue
   fi
   #Sort records file into reptmp.txt and call the report script
   case $SEL in
      1) #Print file as is from reptmp.txt
         cp $NRECS $TMPRPT
         exec $NBIN/namerep.sh;;
      2) #Sort file on 4th field into reptmp.txt
         sort -t# -k 4,4 -o $TMPRPT $NRECS
         exec $NBIN/namerep.sh;;
      3) #Sort file on 3rd field into reptmp.txt
         sort -t# -k 3,3 -o $TMPRPT $NRECS
         exec $NBIN/namerep.sh;;
      4) QUIT=1
         continue;;
      *) continue;;
   esac
done
#Replace this shell with the calling menu
exec $NBIN/namesmenu.sh
The syntax for sort uses -t for the field separator, -k for the sort key, n,n to describe which fields to sort on, and -o to specify an output file, which here, is the temporary file $TMPRPT. The report is called with the exec command which replaces the currently running command process with the named one, instead of creating another process. This is only really necessary to save memory especially on slower computers, but using exec also does make sure that there is only one program to exit in case of a system hiccup so it's tidier script policy.
Picture of: Reports Menu
To make the menu return work properly the exit statement at the end of the namesrec.sh script needs to be replaced with:
#Replace this shell with the calling menu
exec $NBIN/namesmenu.sh
and the namerep.sh script needs to be replaced with these lines which wait for a user response before returning, otherwise you wouldn't have time to see the report before it returned to the calling script:
Code:
echo ""
echo ""
echo "Press Enter when Done"
read RESPONSE
#Replace this shell with the calling menu
exec $NBIN/namereports.sh
Picture of: Reference Number Sorted Report
Summing Up
This part of the article has covered a lot a basic shell scripting techniques, commands, syntax and layout, including the use of tput to give a pseudo windowing interface, a menu hierarchy to make your scripting user friendly and an introduction to the use of awk and sort, two very useful commands for processing user files. There was also plenty of editing practice.
The next part of the article will deal with input and record validation and editing existing records, and introduce the use of the “dialog” command to make shell windowing even more user friendly.
When writing these scripts I made frequent use of man and info, looking up the correct syntax, options and use of the commands used in the scripts.
BOXOUTS
BOXOUT 1 Surfing the File Trees.
I often visualise the Linux file storage tree as a real one that I can scurry around. All branch joints or “junctions” have the names of its sub junctions and so on. Some junctions contain nodes to files, programs, and hardware control ports. I visualise nodes sometimes as icons, but mostly as looking into to rooms full of either information or machines, some of it very interesting and able to be used by me
I get around the tree on my custom electric tree surfing board, it only knows the basics, but it looks cool.
This example shows you how to comprehend something as mundane as file tree navigation,
as something visually interesting for you personally to easily learn, visualise and use.
Some environment variables which are set when any shell console or program starts, allow a user to start navigation from named sub branch junctions. Like the $HOME example in the scripts. You can use this trick yourself by setting up your own environment variables by writing small setup scripts for your projects. So in the $HOME/Projects folder there could be a shell script called namesref.rc, and it could contain.
typing “cd $NHOME” would get the shell to take your prompt into the $NHOME file tree junction folder and set this as the current working folder.
There are some aliases for the current and previous junction in the tree. Full stop is used as the current folder, two full stops alias the previous junction folder.
The commands:
Code:
cd .
stays where it is, and
Code:
cd ..
changes to the parent junction of this one which is one level up in the branches.
Code:
cd ../../..
Changes three levels up
Code:
cd /
go directly to the top of the tree, a good place if you get lost. All paths up start here. This top most point is laughingly called the root of the tree. When it just as easily could be viewed as building of doors leading to passages and other rooms with other doors in a sideways visualisation.
Code:
cd ~
is a handy short alias for $HOME
$HOME is a safe place for all your personal and private folder trees and the only place to robustly store your own stuff on the hard drive. You can burn this folder to a CD every week, knowing all the important stuff is safe, and a history of at least the last 13 saves just in case something important got deleted a while back.
BOXOUT 2 Changing your Prompt
The main prompt string at the command line is called PS1
Bash allows the prompt string to be customized by inserting a number of backslash-escaped special characters. Some commonly used ones are:
\h the host name up to the first dot
\t the current time in 24-hour HH:MM:SS format
\u the username of the current user
\w the current working directory, with $HOME abbreviated with a tilde
On my machine the prompt is set by the string PS1='$(ppwd \l)\u@\h:\w> '
I could change this with the assignment:
Code:
PS1=”Yes Illustrious One> ”
I could make sure it always said this by adding this line at the end of my personal bash run control file in $HOME/.bashrc.
BOXOUT 3 Dialog
Dialog is a program that lets you display a variety of questions, messages or selection menus using dialog boxes from a shell script. The following named types of dialog boxes are implemented:
calendar, checklist, form, fselect, gauge, infobox, inputbox, inputmenu, menu, msgbox (message), password, radiolist, tailbox, tailboxbg, textbox, timebox, and yesno (yes/no).
In many dialog boxes, users can move around items by pressing the cursor keys, the first letter of a tag as a hot-key, or the number keys 1-9, and the Tab key.
Dialog is initialised for your home folder by the command
Code:
dialog --create-rc $HOME/.dialogrc
If you can obtain the sources of dialog, they contain several samples of how to use the different box options and how they look. You will find the examples in the folder “samples/” of the source.
BOXOUT 4 Alias
Not to be confused with the TV series, alias can help the Windows user to migrate to Linux by creating aliases for Linux commands that have more meaning for the user.
An alias can be typed at the shell prompt for use in one session, or can be saved in the user's home folder in the file .alias with this line included at the end of the user's .bashrc file. This command uses the test command, which up till now has been used in its [Condition] format. The two “&s” are used to tell the shell to run the next command only if the first is successful.
Code:
test -s ~/.alias && . ~/.alias
Your Linux system probably already has a lot of aliases which can be displayed on a console with the command: “alias”
You create a new alias with the command like this:
Code:
alias copy=”cp”

alias longlist=”ls -l”
(Actually longlist is much too long as a short cut. “lsl” would be better. Long name aliases are used to identify commands that you don't want to enter accidentaly. )
Existing command names can be aliased to give a different output as in
Code:
alias ls=”ls -CF”
to give ls a columised annotated output.
BOXOUT 5 Fortune cookies in your console
Fortune is a shell command that prints a witty saying on the console. You can include the fortune command at the end of your .bashrc file and it will print one for you every time you start a new console. At a shell promt type
Code:
fortune
Some Linux versions include fortunes that are not suitable for children, which is why it is not turned on by default.
Just a small typo. But since it causes an error in your script I thought I'd report it to you.
Quote:
The name of this script will be namerep.sh and will be saved in the bin folder. Make a header and add the same File and Variable assignments as in the namerecs.sh file. This is an example of reuse. Even if they are not all used, it is quicker to copy the lot than create a new entirely specific section.
Later in the article you change the name of the script to namereports.sh.
Quote:
Code:
 case $SEL in
1) exec $NBIN/namerecs.sh;;
2) exec $NBIN/namereports.sh;;
3) QUIT=1
continue;;
*) continue;;
esac
Then in the next version of the menu script it get's changed back to the original namerep.sh.
<edit> Nevermind, I see now that there are 2 scripts, namereports.sh and namerep.sh. That fact isn't real clear if you are a dummy like me just following along, trying to make this work.
LinuxQuestions.org is looking for people interested in writing
Editorials, Articles, Reviews, and more. If you'd like to contribute
content, let us know.


<edit> Nevermind, I see now that there are 2 scripts, namereports.sh and namerep.sh. That fact isn't real clear if you are a dummy like me just following along, trying to make this work.